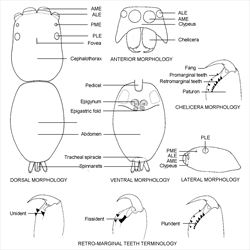
General morphology of jumping spiders
Illustrator (and ©) M. Zabka (QMB), B.J. Richardson (CSIRO)
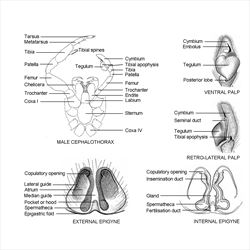
Genitalia and limb morphology of jumping spiders
Illustrator (and ©) M. Zabka (QMB), B.J. Richardson (CSIRO)

Orientation terms
Illustrator (and ©) M. Zabka (QMB), B.J. Richardson (CSIRO)
USING THE KEY
1. Introduction to using a LUCID key
2. Explanation of technical terms
3. Pictures
4. Information sheet
5. For the photographer
6. For the taxonomist
7. Some hints for starting
8. Abbreviations
1. Introduction to using a LUCID key
Please note LUCID keys do not depend on checking features in a fixed order – you can start anywhere and proceed in any order. (Note: Lucid uses the term ‘feature’ where other places might use ‘character’.)
The upper left section (or pane) shows ‘Features Available’ to investigate. Feature sets deal with different aspects of the anatomy. When opened (by clicking a small square at the left), each feature set shows a further list of one or more features. For example, the feature set ‘General Morphology’ contains two features, ‘Overall body form’ and ‘Size – total length’.
If a feature is opened it shows its feature states. For example, ‘Size – total length’ contains ‘Small: <4mm’; ‘Medium: 4-8mm’; ‘Large: 8-11mm’: and ‘Very large: >11mm’. You can choose or ‘unchoose’ a feature state by clicking in the tick-box.
The lower left section ‘Features Chosen’ shows all the features chosen at any point in your progress.
The upper right section shows ‘Entities Remaining’. In this key, entities are salticid genera. The lower right section shows ‘Entities Discarded’. These are the salticid genera whose features do not match your feature state choices at any given point.
Each genus has two icons attached. The picture icon, when clicked, shows an image which is the first of the image plates for that genus. The other available plates of images are represented by a list of thumbnail images below the open plate. A click on one of the thumbnail pictures opens that plate. The size of the picture can be changed using ctrl&+ or ctrl&-. Clicking on the black area around the plate closes the screen.
The text icon leads to an account of its ‘Taxonomy’, ‘Description’, ‘Biology’, ‘Distribution’ and ‘References’. Clicking on the thumbnail pictures opens the plates in a similar fashion to the picture icons.
To use the key, expand a feature set top left. Next, expand a feature within the set. Feature states are then shown with words and images.
When your mouse is clicked on the image a bigger view appears. Further information to help make a decision may be found below the enlarged picture.
To choose a feature present in the specimen or photograph you are trying to identify, click on the tick-box for the relevant feature state. Doing so results in the feature appearing in ‘Features Chosen’ below. Continue choosing features and feature states you can recognise as present in what you are trying to identify.
Choosing features results in the top right pane showing those genera which are still in play as possibilities.
The aim is to reduce the number of remaining genera by selecting features until you can identify your specimen, either because it is the only genus left in the ‘Entities Remaining’ pane, or because you can recognise your specimen from the small number of genera remaining.
You can ‘unchoose’ (or deselect) any feature by clicking it in either of the two left hand side panes and the tick will disappear.
The effect of ‘unchoosing’ features usually results in more genera moving back into the ‘Entities Remaining’ from the ‘Entities Discarded’.
The wand symbol ‘Best’ icon in the toolbar identifies what is deemed by the key as the most useful feature to choose at any point. To refresh this set after a feature has been chosen, click the wand again. You can keep clicking the wand to find other useful features if you are presented with a feature which is not available or ambiguous for your specimen, for example if the feature is only found on a missing leg.
The scissors symbol ‘Prune’ icon deletes the features no longer held by any of the remaining genera, which declutters the choices.
The lightning bolt ‘Shortcuts’ icon gives you direct access to features without having to click through the tree of possibilities top left.
The nested table symbol ‘Differences’ icon shows you how each of the remaining genera score for each of the remaining features. This allows you to compare genera without actually choosing features.
The question mark ‘Help’ symbol contains general advice on using a LUCID key.
To refresh the key and start again click on the recycle symbol ‘Restart’ icon top left.
2. Anatomy and glossary
At the top of the list of ‘Entities Remaining’ there is a picture icon beside Salticidae leading to plates of anatomy and their names. The text icon links to this document. Other specialist words are often defined under the picture of the relevant character state.
3. Images
A number of plates, (several images combined) are provided for each genus. These can be viewed by clicking the picture icon in the entities panes on the right hand side. These include images of specimens alive and preserved, plus diverse anatomical parts, ventral and lateral views of the male palpal organ and external and internal views of the female epigyne.
4. Information Sheet
Each information sheet is a written account of a genus with a description, known species, taxonomy, evolutionary relationships, morphology, distribution, habits and references. The palp described is always the left palp viewed ventrally.
5. For the photographer
To be useful in a key of this type, photographs of specimens should include views from above, from the side and directly from the front or face-on in which case the front eyes need to be on a plane parallel to that of the camera lens, and from above, the front eyes (not the carapace) need to be at right angles to the lens. Immature specimens are generally not useful. Young males in particular often show female feature states.
6. For the taxonomist
In Australian salticids, given the large amount of taxonomy still to be done, some genera will in future be split into several genera, for example Opisthoncus. In other cases genera have been used which do not actually exist in Australia, for example Salpesia. The current state of taxonomy is used, even if known to be insufficient, thus Salpesia is included. When the species are assigned to other genera, the key can be updated.
Some historically recorded Australian genera are so poorly known or so unlikely to be present that it has not been possible to include them in the key. Some users may be familiar with generic names no longer used for any species in Australia including Ascyltus, Asemonea, Breda, Chrysilla, Ergane, Habrocestum, Heliophanus, Lauharulla, Lycidas, Omoedus and Sigytes. Three genera, Capeyorkia, Maddisonia and Parahelpis are only known from males, so female specific characters could not be included. There are also many undescribed genera known or estimated to be present in Australia. These factors all place limitations on the key’s usefulness. Unless otherwise stated a genus has only been found in Australia.
7. Some hints for starting
At the top of the list of features is the option ‘choose sex’. Selecting the relevant option will remove irrelevant features, for example, male only features if the specimen is a female. If the specimen is female, after choosing the sex a further option ‘Has the epigyne been dissected and cleared’ appears. The resulting characters are for the specialist and ‘No’ should normally be ticked as they can cause confusion.
If you are new to the science, the easiest way to begin is to start with one of the general morphology views. Compare the specimen with the features in order for the first few in the list. Skip any features that you are uncertain about and ensure you use the scissors button after each decision. Move to another view of the specimen if needed. When the number of genera is reduced, try using the wand button to find other useful features. Re-use the wand button as necessary to find something you can see, if the first one is not useful.
You can of course simply ‘look at the pictures’ in the plates in the Entities list on the right hand side. However genera can look very similar and can be easily confused.
The wand can simply be used sequentially to provide an efficient way to reach a conclusion. However the wand often offers features that are difficult to check.